Method - Calibrating the extruders
On Method series printers, a good extruder calibration is critical for print success. The Method series printers contain an assisted calibration process for the extruders. This ensures that the nozzles are properly cleaned, and it sets the X, Y, and Z offsets. A quick test print will help you check the calibration results.
Follow the instructions on the display to complete the calibration. This article contains additional information for this procedure. You can also watch the short video below:
When to calibrate the extruders
It is recommended to run the extruder calibration process when:
- You're setting up your new Method printer. This is part of the guided setup process.
- You install a new extruder or extruders.
- There are adhesion issues (to the build plate or between the two materials).
- The two materials don't align well (in the X and/or Y direction).
- You experience other print quality issues that could be related to the extruder calibration.
Running the extruder calibration process is a good first troubleshooting step on Method series printers if you have print quality issues or a decreased success rate.
Requirements
To perform the calibration, you need the following:
- Ensure that two extruders are installed and secured with the clip.
- To clean the nozzles, you need the wire brush from the Method accessories.
- You need two materials for the test print.
The calibration can take up to 10 minutes, and the test print takes about 30.
Calibration steps
Once you select the extruder calibration in the Method menu and press Begin calibration, the printer will guide you through the steps. There are some preparation steps (ensuring the build plate is not installed and checking that the components are clean) before the automated calibration can begin.
1. Remove the build plate
For the extruders to be able to access the build platform, the build plate must not be installed. Open the chamber door, remove the build plate from the printer, and confirm this on the display.
2. Clean the nozzles
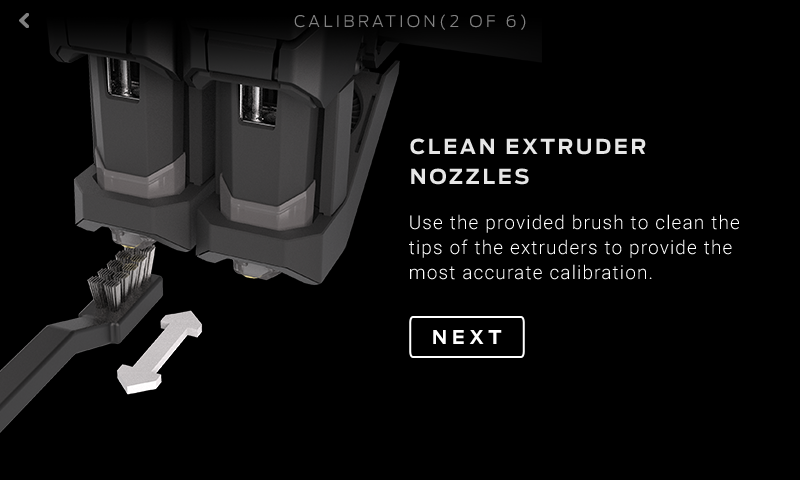
It is very important for the calibration process that the extruder nozzles are completely clean. Closely inspect the tip of the nozzle on each extruder. If there is any material on the nozzle at all, this can cause incorrect calibration results. Any material debris on the tip of the extruder nozzle can affect the Z calibration, while material debris on the side of a nozzle can affect the XY calibration. If you see any material, select Clean extruders to be guided through the cleaning process.
It is not recommended to skip this step, even for new extruders, as they may have some material left on or in them from the testing process.
When using the metal brush, it is important to clean the nozzles thoroughly. Start with the bottom and then clean at a 45° angle from both sides. If you see material oozing out of a nozzle, you can also hold the metal brush at a 90° angle.
3. Clean the calibration target
The calibration target is a small metal square that is located in the build platform (normally under the build plate). Make sure there is no material debris or other small objects in this area, as this can interfere with the calibration. Especially if you just brushed the extruder nozzles, check that no pieces fell in the calibration target area. Clean this part of the build platform with tweezers or canned air, if needed.
This is not part of the guided procedure. Clean the target area before completing the extruder cleaning part of the process. Do not touch the hot nozzles.
4. Automated calibration process
When the preparation steps are complete, the printer will cool down the extruders and begin the calibration process. The extruders will perform some measurements in the calibration target area. This is an automated process; you do not need to do anything until the calibration is complete. This will take several minutes. When it is finished, the screen will update.
5. Install build plate
Once the calibration process has finished, you can reinstall the build plate on the build platform again.
Test print
To ensure that the calibration is successful and the extruder alignment is good, run the calibration test print. You can find the model here.
Print the file with your build material and support material, using a default profile. After the print is complete, carefully remove it from the build plate to evaluate it.
Follow the checks listed below to check the calibration or watch this short video:
1. Check XY alignment
First, check if there are X and Y gaps between the model and the support material. The outer square should separate easily from the center. If the two materials are not well aligned, repeat the calibration process.
Missing source image: xy-offset-test
2. Check the sides
Remove the square piece on top and examine the sides. They should be straight. If instead they look flared, then your nozzles are too close. If they are rounded, then your nozzles are too far away.
Missing source image: z-offset-test-side-A-EplguZY
3. Check the underside
Take a look at the underside of the top piece, and use the images below as a reference. You should be able to clearly see the extrusion path. If the lines look squiggly, the nozzle is too far away (left). If the lines are squished, the nozzle is too close (right).
Missing source image: 0EMQQ00000fVJht
If, based on these checks, you determine that your calibration is off, please run the calibration process again. Thoroughly clean the nozzles to ensure that they are 100% clean.
Calibration offset reading
If you find that issues don't resolve after recalibrating, or the calibration test print continues to yield results that suggest an inaccurate calibration, you may want to examine the Calibration Offset readings to determine whether or not the calibrations are similar.
See the video guide below to learn how to read and record the Calibration Offsets.
If you have multiple bad calibrations after performing the calibration process accurately, please contact support. It is helpful to come prepared with Calibration Offset comparisons for more efficient analysis and troubleshooting.